在学习脚手架之前,首先得先了解脚手架是的什么
对于的学习脚手架,先从一个脑图开始
- [脚手架学习路线]
- 什么是脚手架
- 脚手架分类
- 一、代码块脚手架
- 二、单文件脚手架
- 三、多文件(组件)脚手架
- 四、项目脚手架
- 参考资料
什么是脚手架
是为了保证各施工过程顺利进行而搭设的工作平台。这便是脚手架。
而前端脚手架是指通过选择几个选项快速搭建项目基础代码的工具,可以有效避免重复的代码框架和基础配置。
脚手架分类
一、代码块脚手架
一般指我们在编译器中使用的代码片段,前端使用 vscode 编译器时,部分插件已经提供了代码片段的能力,根据关键字以及输入的代码行,匹配响应的代码片段,常见的开发插件有,ES6 react/redux/react-native 、vue language feature 之类的插件,当然开发者也可自己配置符合自己习惯的代码片段。代码片段相关配置可以参考vscode 代码片段配置
当然我们这里可以简单介绍一下配置流程
设置用户代码片段
打开设置点开用户代码片段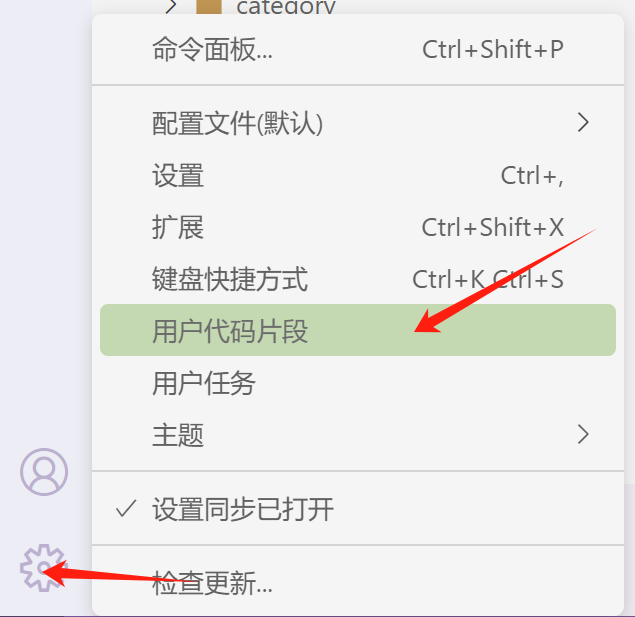
选择编辑或者新建代码片段
编辑代码片段
1 | { |
保存完即可启用
相关变量
1 | TM_LINE_INDEX:行号(从零开始); |
二、单文件脚手架
为了更贴近于实际开发,这里我们模仿vue-cli等脚手架工具搭建脚手架项目时的做法,做一个简单的单文件类型脚手架的搭建demo(多文件和项目类型的脚手架原理也一样)。
在使用vue-cli等脚手架工具搭建脚手架项目时,它会先询问一些问题,而后这些脚手架会根据这些问题的答案并结合它自带的项目模板创建出一个脚手架项目。
模板文件
template.txt,这里简化一下模板内容
1 | <%= param1 %> |
其中模板中的动态部分就是param1参数
而我们的需求就是实现的一个脚本,这个脚本在运行之后能够根据模板内容创建得到一个单文件脚手架,并且其中模板中的param1参数需要替换成我们的输入参数。
编写脚本文件
思路
- 输入:脚手架模板、用户输入的模板参数
- 输出:目标单文件类型脚手架
- 映射关系:模板解析、IO读写等操作
由上得出结果 coding result cli.js
1 | const inquirer = require('inquirer'); // 用于与命令行交互 |
执行脚本
1 | c:\workspace\automate node cli.js |
三、多文件(组件)脚手架
在我们碰到需要搭建一个单 / 多文件类型的脚手架需求,比如搭建一个 vue 组件脚手架(需要创建一个.vue 模板文件、一个.scss 模板文件以及一个.test.js 模板文件),Plop 就会是一个不错的助手。
相对于完全自定义实现脚手架脚本 / 工具而言,使用 Plop 虽然不能实现完全的自定义,但在它的规范下编写脚本可以调用它封装好的 Api,可以实现配置化的脚手架工具。这让我们能够更加关注任务本身,而无需关注过多任务的实现细节,进而提高开发效率。
这里我们简单介绍一下 plop 使用
插件使用第一步 install
1 | yarn add plop --dev |
编写模板
1 | <template>, |
编写plop文件生成脚本
先在项目根目录下创建一个plopfile.js作为plop执行任务时的入口文件。而后在这个入口文件中编写注册我们希望它做的任务,就可以实现以配置化方式实现创建脚手架的功能。
接下来我们编写一个plop自动化创建任务,方便我们创建react组件时调用,它会根据预定义好的模板内容自动创建一个.vue 模板文件、一个.scss 模板文件以及一个.test.js 模板内容文件,实现代码如下
1 | module.exports = plop => { |
使用Plop执行Plop任务
1 | yarn plop component |
我们就可以通过Plop工具而不是原生脚本去实现搭建一个vue组件脚手架的需求
四、项目脚手架
在日常开发中,我们会根据经验沉淀出一些项目模板,在不同在项目中可以进行复用。如果是每次都是通过拷贝代码到新项目的话,这样会比较麻烦,而且容易出错,此时我们就会想能不能将一些模板集成到脚手架(类似vue-cli, create-react-app)中,这样我们进行初始化创建就能使用了
在创建项目级脚手架的之前,先要了解几个必备的知识
- commander 自定义命令行指令
- inquirer 在命令行中实现与用户交互
- fs-extra fs扩展,用于读写文件
- chalk 终端美化输出
- figlet 可以在终端输出logo
- ora 控制台的loading动画
- download-git-repo 下载远程模板
创建脚手架
初始化项目文件 npm init && git init
创建指令文件
1 | ├─ bin |
指令文件注册
1 | { |
注意
修改入口文件index.js为如下内容,文件以#!开头代表这个文件被当做一个执行文件来执行,可以当做脚本运行。后面的/usr/bin/env node代表这个文件用node执行
1 | #!/usr/bin/env node |
注册命令
1 | npm link |
执行命令
1 | demo-cli |
到这儿我们的脚手架已经算是创建成功了,只是还不具备生成项目模板的功能,这就需要我们自己去扩展
编写脚手架脚本
在编写脚本之前我们先简单介绍一些关于inquirer的指令
- type:表示提问的类型,包括:input, confirm, list, rawlist, expand, checkbox, password, editor;
- name: 存储当前问题回答的变量;
- message:问题的描述;
- default:默认值;
- choices:列表选项,在某些 type 下可用,并且包含一个分隔符(separator);
- validate:对用户的回答进行校验;
- filter:对用户的回答进行过滤处理,返回处理后的值;
- when:根据前面问题的回答,判断当前问题是否需要被回答;
- prefix:修改 message 默认前缀;
- suffix:修改 message 默认后缀。
首先在入口文件处获取与用户之前的交互信息
1 |
|
此时已经完成一个用户交互的闭环,下面开始编写/lib/create完成一个下载gitlab模板的脚手架
大部分公司的gitlab都属于私有化部署,这里就不介绍gitlab 令牌生成规则以及相关api的功能了
create逻辑编写
- 获取用户create命令参数
- 判断当前目录是否有重名文件
- 获取组织下仓库模板列表
- 用户根据分支或者标签选择模板
- 根据选择结果获取资源列表
- 选定资源模板后进行下载
- 在当前目录下生成新项目
综上可得
1 | const axios = require("axios"); // 接口请求封装 |
以上逻辑其实用到了一些常量,让我们一起来看
const/index.js
1 | const { token, url, clonePre } = require("./private"); |
private.js
1 | // for templates group |
__END__